DEMO - Horisontal Lines DEMO - Vertical Cubes DEMO - Horisontal 1 Cube

Saturday, July 31, 2010


How To Become The System User in Window Xp


If you think Administrator has the largest privileges onto the computer, then you are wrong. There is a user who is named SYSTEM. SYSTEM has full control of the operating system and it’s kernel. If you open windows task manager (press ctrl+alt and delete) you will see that System User controls several processes. These processes cannot be closed by Administrator. In this tutorial we will see how to trick Windows into running our desktop as System. So we’ll get a much greater privileges over computer.

1.Open Command Prompt. Go to Start , then Run. In Run option type cmd and click OK. After this will open Command Prompt, or Start->All Programs ->Accessories->Command Prompt

2. In Command Prompt write at 13:55 /interactive “cmd.exe” and press enter , the time is usually a minute or two ahead of your present time in the 24 hours format.


After a minute or two will appear new Comand Prompt Window wit different title bar. It has changed from cmd.exe to svchost.exe.


3. End current explorer.exe process. Open Task Manager, select explorer.exe and click End Process.


4. In new Comand Prompt with title svchost.exe write cd.. and press enter , then write explorer.exe and press enter.


After this you will become SYSTEM user,

Read more...

Change Startup & Shutdown Sound

Tuesday, July 27, 2010

Change Startup & Shutdown Sound


Do you get tired of listening same windows startup and shutdown sound?? If yes, then this trick is for you. By using this you can change default windows startup and shutdown sound and can use any of your favorite voice or music as your system's shutdown and start up. Here are steps for this.

1). Choose the track or sound which you want to set as start-up and shutdown sound, But remember that file should be in .WAV format and size of file should not be large it should be smaller than 1 m b otherwise startup will take longer time.

If your file is not in .WAV format then you can easily convert it into .WAV by using jet audio or any other converter.

2). Rename these files as Windows Startup.WAV and Windows Shutdown.WAV respectively.


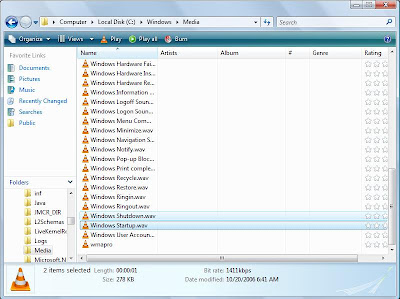
3). Now Go to C:\WINDOWS\MEDIA, here you will find file Windows Startup.WAV and Windows Shutdown.WAV, move them to some other locations, So that you can set default sound again in future.

4). Now move files which you have choosen to C:\WINDOWS\MEDIA.
Its done.

Read more...

Capslock Notification - screen flash and computer beeps

Capslock Notification - screen flash and computer beeps


Here is trick for capslock notification, it make your screen flash and computer beeps everytime you press capslock button. It will let you know that capslock is on when you accidently hit it during typing. Its very simple just follow these steps:
For window vista
1). Go to control panel.
2). In control panel, click on ease of access center.
3). Now click on make the keyboard easier to use.


4). Click on turn on toggle key and then click save.


5). Now again go to ease of acess window, then click on use text or visual alternative for sounds.


6). Here choose flash active window and then click save.
Its done.
For window XP
1). Go to control panel.
2). Open the Accessibility Options Icon.
3). On the Keyboard tab, click the Use Toggle Keys checkbox.
4). Click ok.
5) Go to Accessibility Options screen, click theSound tab and check the Use SoundSentrycheckbox.
6). Next click the Settings button and selectFlash active window from the Warning for windowed programs drop down box.
7). Click ok.
Its done.
Now whenever you press capslock, your screen will flash and produce beep.


Read more...

Vista Style Analog Desktop Clock For Window Xp

One of the features that regular users seem to love in Windows Vista is the sidebar’s analog clock. Every time I glance at somebody’s desktop in a coffee shop they are using one. Windows XP users are not left out in the cold with the ClocX desktop clock that works similarly.

The clock really looks slick, especially if you choose a nice looking theme:

image

If you right-click on the clock you can change some of the common options, and also get to the options panel.

image

The options panel has loads of different options you can choose from… note that you can use the Pin to Desktop option in here and remove Always on top if you want the clock below all the other windows.

image

On the Appearance tab you can change the theme to any one of the preloaded themes.

image

From the clock’s right-click menu you can also access the Alarms feature, which is surprisingly full-featured.

image

Clicking on the New button brings you to the Alarm editor, where you can use the standard options for time, date and recurrence, but you can even set it to launch an application, sound or even a video.

image

I’m not a big fan of these types of clocks, but it seems like everybody I know loves them, so here you are!

Read more...

Saturday, July 24, 2010

Solution For LAN Connection Between Windows XP And Windows


Many of you might have the problem sharing files and folders between Windows XP and Windows 7 OS. This is not so long tutorial but you can solve it just changing some values in your windows settings. By default Windows XP sets your Workgroup as MSHOME. While windows 7 feature WORKGROUP as your default workgroup you can easily get rid of this problem.
To connect Windows 7 OS with Windows XP, change the workgroup name of either one of the OS. I recommend you changing the workgroup name of Windows XP from MSHOME to WORKGROUP.
To change Workgroup in Windows XP, right click on my computer and click on properties.

In Computer name tab, check the workgroup. By default it is MSHOME. (In my case I named itWORKGROUP).
To change it, click on Change button.
A new window will pop up. There you can define your own workgroup name.
Now both of your OSes have same workgroup name.
Now in windows 7 PC, go to control panel > Network and Sharing Center.
At the left sidebar, click on Change advanced sharing settings.
In new window, Turn on Network discovery, File and printer sharing and Public folder sharing by clicking on the respective radio button.
Under File sharing connections, Click on Files sharing for devices that use 40- or 56- bit encryption. (Windows XP may not support 128 bit encryption) .
And turn of Password protected sharing.
Do the same for Public and Home or Network connection
Now you may run Home Network wizard (Control Panel>Setup Home Network) in windows XP. Then there you’ll have easy LAN connection. Make sure that workgroup name during wizard is setup to WORKGROUPnot MSHOME
Now you can easily access files and folder and even internet and printers from network.
You can see the files in network.


Read more...

How To Repair Detechtable But Corrupt USB Drive

How To Repair Detectable But Corrupt USB Drive

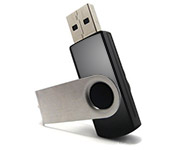
https://blogger.googleusercontent.com/img/b/R29vZ2xl/AVvXsEhIJFjkatJWP-fpsrAJHU2Q6aBn_Oqy3JIiE8tg6nnTQEYYYgkS2g0wsyFSTanVxJ_sdex5t5u8iLQjG5fd4b9IiJMdIB61usgwaD7kWCbN7emPtO91f45Vs5VrAQqd7KJOP5_Mfu5kKROQ/s1600/usbdrive.jpg
Have you suddenly encountered with the problem that when you plug in your USB drive, the Removable media shows up but when you try to open it, it returns with the message “Please insert a disk in to drive H:”.

If yes then you have been on right tutorial page.

By applying this simple method you’ll have 80 % chance to get back your USB drive hardware.

This works only in the above error condition. If the windows doesn’t detect your USB drive, then there is probably flaw in the USB media.
Please keep in mind that, you’ll have to lose your data when following this tutorial.
Plug in your USB drive.
Go to Start>My Computer, right click on My Computer icon and click on Manage menu.
Computer Management window will pop up. Click on Disk management under Storage tree menu.
Now at the right side of the window right click on your removable media. (unlike the image below, it will show unknown information), right click on your removable media and choose Change Drive Letter and Paths.
Now in new window choose any drive later that is not taken by any media (M:, N: , :K: etc).

Now in new window choose any drive later that is not taken by any media (M:, N: , :K: etc).
Click on ok button and close the management window. Try opening your pendirve. There may be the chance to have your pendrive recovered if this method worked.
If the problem still prevails then follow the above tutorial but instead of choosing Change drive letter and paths, choose Fomrat and give a quick format to it.
Now you’ll have finally lost your data but the pendrive is safe in your hands.
Hope this tutorial was working. If it didn’t please do comment me. I’ll find other solutions as well.

Read more...

How To Add Windows 7 To XP Boot Screen?

How To Add Windows 7 To XP Boot Screen?

http://fc01.deviantart.com/fs22/f/2008/017/d/4/Windows_Seven_January_08_by_xazac87.jpg

I had windows xp and 7 on my pc but I re-installed windows xp because of some problems so now it only boots to XP but i'm sure there's a way to add the windows 7 to the boot menu without having to re-install the Windows 7 again

I found solution:
1. Insert Windows 7 DVD and boot into it
2. Go to Repair computer > Highlight your W7 installation > Click Next > Get to the command prompt and type the following:
Bootrec.exe /REBUILDBCD

If the command is successful, close the Command Prompt window.
3. NOW Click “Startup Repair” to perform Windows Startup Repair. After doing these computer will reboot automatically.

If it works, and boots into W7 while seeing the XP dual boot option, then you're good to go.

If it works, and boots into W7 but has no option for XP, you'll have to run some commands in Command Prompt, in W7, which I have written below. Replace the driver letter in the third line with that of the XP partition.
a. Get to cmd in W7. Run as admin if you need to.
b. Type the following commands and press enter, one by one.

bcdedit /create {ntldr} /d “Windows XP Professional”

bcdedit /displayorder {ntldr} /addlast

bcdedit /set {ntldr} device partition=X:

bcdedit /set {ntldr} path \ntldr


When you've run all the commands, hit F8 at boot to see if it's all fixed.

Read more...

Google Search

  © Design by SaaJaN SeHwala pu7.blogspot.com 2009 - 2010

Back to TOP